The Ableton Randomized FX Chain is a dynamic effect rack built from stock devices and automation tools that reshapes input sounds into unpredictable, textured outputs. It uses Resonator and Corpus with randomized parameters via Expression Control and Max for Live LFOs. A free Valhalla Frequency Echo adds shifting delay and pitch movement.
The chain can be toggled on/off to freeze results mid-playback, allowing immediate resampling of desirable artifacts. Designed for transforming basic one-shots into drones, fills, or ambient FX, it maintains control through structured randomness while allowing continuous variation. All modulation is parameter-specific to avoid correlated movement.
Introduction
Want to turn a basic snare or synth pluck into something unrecognizable, but still usable? This randomized FX chain in Ableton Live lets you generate constantly changing textures without losing control.
In this walkthrough, I’ll show you how I built a randomized FX chain in Ableton using Resonator, Corpus, Expression Control, and more. Every sound morphs on its own, but you still get full control when needed. All stock Ableton devices, plus one free third-party plugin. You’ll also find a free sample pack made from this exact chain.
Build a Randomized FX Chain in Ableton Live
Let’s break down how this randomized FX chain in Ableton Live actually works.
01. Start with a Basic Sound
I started with a snare. You can use anything like a rimshot, a pluck, or even a mic stand tap. The idea is to change it into something rich, unexpected, and useful for layering, drones, or weird fills.
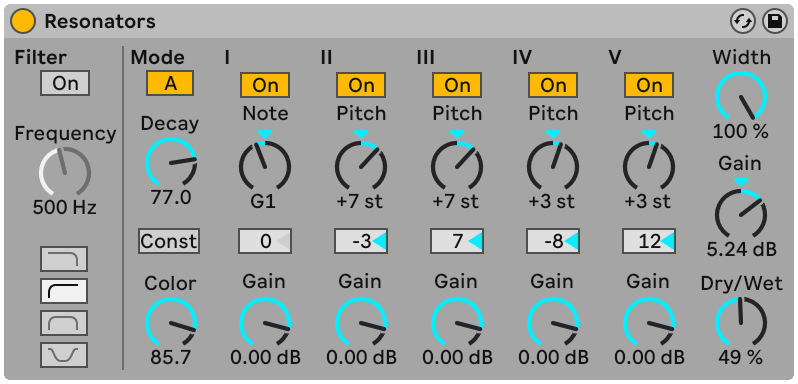
02. Resonator + Expression Control
First, I dropped in Ableton’s Resonator. By default, it adds a tonal ring to your sample. But I didn’t want it static. That’s where Expression Control comes in.
Here’s how I set it up:
- Create a new MIDI track
- Set MIDI From: All Ins
- Insert an Expression Control device
- Assign each of the five controls to knobs on Resonator
- Draw a short MIDI clip with a note at C3 (the note doesn’t matter)
- Loop it. Each pass will randomize all mapped parameters
Want a new random set? Just drag the clip slightly. That instantly retriggers the randomization, eliminating the need to stop playback or delete anything.
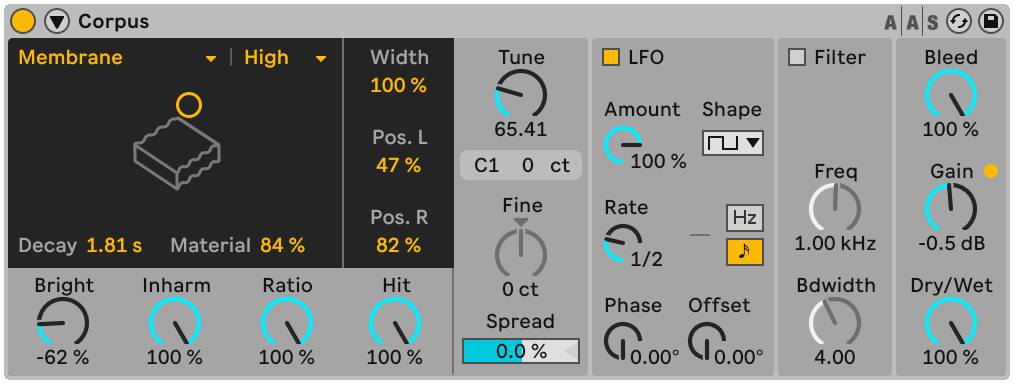
03. Corpus: Full Randomization
I added Corpus and switched it to Pipe Mode. That enables the Radius parameter, which I also wanted to automate. To randomize everything inside Corpus:
- I duplicated four LFOs from Max for Live
- Each LFO was set to Random waveform and synced to 1 bar
- Mapped LFO 1 → Decay, LFO 2 → Material, LFO 3 → Tuning, LFO 4 → Radius
Important: I didn’t reuse the same LFO. If you map one LFO to all knobs, they move together and land on the same values. That kills the true randomization.
For the Resonance Type in Corpus, I still had one free Expression Control lane, so I assigned it there too.
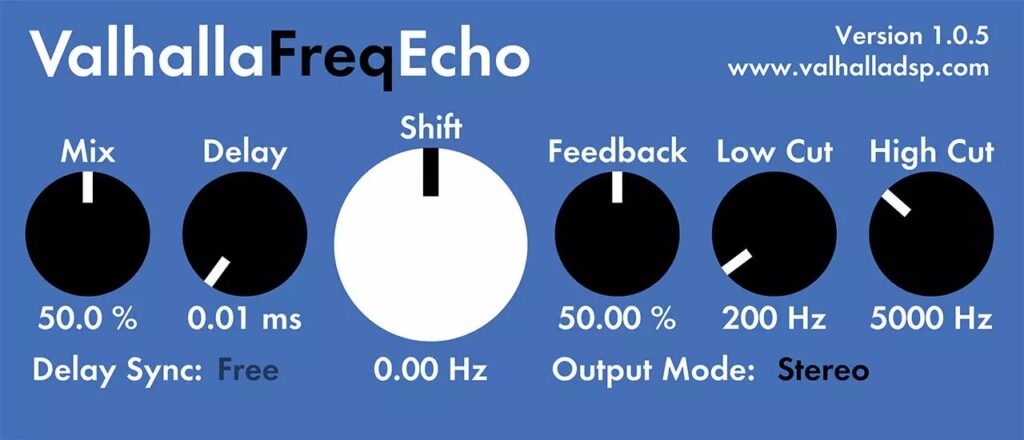
04. Add Frequency Echo (Free)
I loaded Valhalla Frequency Echo (free plugin) and mapped two LFOs to its Shift and Delay parameters. Then I:
- Pulled the mix back
- Added a low cut to protect the low end
- Dropped the feedback to avoid overload
This added a glitchy pitch-shifting effect, which changed slightly every few bars.
05. Shape Volume + Structure
At the beginning, I added a Utility to boost gain. I also placed a Limiter before the reverb. Because input volume affects the reverb’s tail. Later, I moved the Limiter after the Reverb to exaggerate it.
I also added a second Reverb after Corpus, around 50% wet, to smooth things out. Then came a quick test with Overdrive, first before the Reverb, then behind the Corpus. Both gave different results depending on gain and placement.
06. Freeze Good Moments with One Key
Let’s say you hear a perfect texture, but you know it’ll change again next bar. Here’s what you can do:
- Group the whole FX chain
- Pressed Cmd/Ctrl + K to open Key Mapping
- Assigned a key to the Group On/Off toggle
Now I can freeze a moment when it sounds good, then unfreeze to re-roll the chaos. Simple, but super useful.
07. Test It on Other Sounds
I tested the chain on:
- A pluck
- A rimshot
- Mic arm tap
- A saw wave
- A dry bass note
Each one changed in a unique way. Some became drones, others became rhythmic FX or eerie textures.
08. Free Sounds from This Video
I recorded multiple variations of these sounds and packed them into a free downloadable sample pack.
→ Download Free Sounds from This Video
You’ll also find the rack used in this video at the link above (which is not free).
Bonus: Like These Kinds of Sounds?
If you’re into processing and manipulation, check out:
- String Manipulation – organic string textures creatively warped for FX and ambient use
- Orchestral Manipulation Bundle – includes the Drum and String packs + extra presets and exclusive sounds
Want More Tricks Like This?
In a previous blog post, I showed how I turned mic arm recordings into impulse responses using Convolution Reverb. That method paired well with this one, and gave me some of the weird sounds you heard here. Read that post here.
Final Thoughts
This randomized FX chain in Ableton Live is built for exploration, but gives you ways to freeze, repeat, and resample what works. Try it on different sources. See what breaks. See what works. And don’t forget to enjoy the process.